
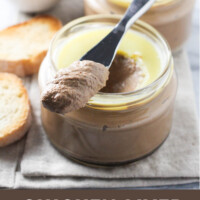
Pashtet (паштет) is a savory spread or pâté popular in Eastern European and Russian cuisine. It can be made from liver, meat, fish, or vegetables. This recipe shows you how to make Russian Chicken Liver Pâté (паштет из куриной печени)—a rich and flavorful classic.
This creamy pâté makes an excellent appetizer and pairs beautifully with toast, crackers, and cheese boards. In Russia, it’s a popular breakfast spread, often enjoyed on rye bread or warm toast.

Chicken livers may not be everyone’s cup of tea, but this easy chicken liver pâté is here to please every palate! Whether you’re a long-time liver lover or hesitant to try it, this recipe turns those humble livers into a luxuriously creamy spread.
Despite the gourmet curb appeal, the ingredients are surprisingly simple – you might already have most of them in your kitchen.
Not to mention, incorporating chicken liver into your diet is a fantastic choice. And what better way to enjoy this unsuspecting superfood than in a silky pâté?
Recipe Highlights
Here are the top reasons you’ll love this pashtet recipe:
- Impressive yet easy. Pashtet is simple enough for beginners yet impressive enough to wow dinner guests. The ingredients are straightforward, many of which you may already have!
- Nutrient-rich. Chicken liver is a fantastic source of essential nutrients, making this dish a healthy choice for most people.
- Versatile serving options. Serve it with crackers, toasted bread, fresh veggies, or even as a spread for sandwiches – the possibilities are endless!
- Budget-friendly. Chicken livers are inexpensive, so you get an impressive, flavorful dish for just a few dollars.
Ingredient Notes
Here is what you’ll need:

Let’s break down the ingredients that make this recipe for chicken livers so special:
- Chicken livers — Our delicious and nutritious starring ingredient! Opt for fresh, plump livers rather than frozen ones for the best flavor and texture.
- Olive oil — To sauté the ingredients. You can also use avocado oil or ghee.
- Onion — Contributes sweetness and depth of flavor. You can also use shallots here if preferred.
- Carrot — Adds a sweet note to the spread and balances the flavors.
- Water — To cook the livers and keep them moist. Feel free to replace it with chicken broth for an extra flavor boost.
- Aromatics — I use bay leaf, garlic powder, black pepper, and nutmeg to flavor the pashtet.
- Salt — Coarse kosher or sea salt recommended. Adjust this amount to taste, especially if you plan to serve the pâté with salty scoopers.
- Butter — Creates a silky, smooth texture and rich flavor. Use unsalted butter to control the seasoning better.
How to Make Pashtet
Here’s an overview of how to make Russian pashtet:
Step 1. Prep the livers.
Place the chicken livers in a bowl, cover with cold water, and soak for 15 minutes. Then rinse and trim any discolored or tough parts. Set aside.


Step 2. Cook the vegetables.
Heat the olive oil in a sauté pan over medium-high heat. Add the onion and cook for 2–3 minutes until it begins to caramelize. Then add the carrot and cook for 2 more minutes until it starts to soften.


Step 3. Cook the livers.
Push the vegetables to the sides and add the livers to the center. Fry, turning often, for 2–3 minutes until beginning to brown.
Stir in the vegetables, then add water, bay leaf, salt, garlic powder, pepper, and nutmeg. Mix, reduce the heat, cover, and simmer for 10–15 minutes, stirring occasionally, until cooked through.


Step 4. Blend the mixture.
Remove the bay leaf and transfer the mixture to a bowl. Add the butter, then blend with an immersion blender until smooth. Alternatively, let it cool slightly and puree in a blender or food processor.


Step 5. Chill and serve.
Transfer the pashtet to a jar or an airtight container. Top with clarified butter if desired. Cover and refrigerate for at least 4 hours, or overnight, to let the flavors develop and the texture thicken. Serve chilled or at room temperature.


Recipe Video
Here is the recipe video to help you make it:
Recipe Tips
Here are my top tips and tricks to ensure your chicken liver pâté turns out perfectly every time:
- Thoroughly clean the chicken livers, trimming away any discolored parts or connective tissue, as these can give the pâté a bitter taste.
- Be careful not to overcook your livers, as overcooking can result in an unpleasant grainy bite. They should be tender and just cooked through.
- For a super smooth pâté, blend the mixture well. If your food processor isn’t achieving the desired texture, pass the pâté through a fine mesh sieve for an ultra-creamy finish.
- Don’t skip the chill time! Allowing the pâté to chill in the refrigerator for at least 4 hours (or overnight) helps the flavors meld beautifully. The pâté will also thicken as it cools.
Variations
Now that you’ve mastered the art of making the basic pashtet recipe, here are some customization ideas to consider:
- Add an apple: Swap the carrot for a chopped apple, or use both for added depth. Apple lends a sweet, floral note and contributes to a smoother, more refined texture.
- Alternate herbs: Don’t hesitate to experiment with fresh herbs you have on hand, like fresh parsley, dill, or chives. Blend them with the cooked liver mixture.
- Add eggs: Blend two hard-boiled eggs into the pate. They add protein and contribute to a richer, creamier texture.
- Add smoky/spicy flavor: Consider introducing a touch of smoked paprika or a few drops of liquid smoke. The smoky depth will pair nicely with the pâté’s richness. If you like a little heat, mix in some cayenne pepper, red pepper flakes, or a dash of hot sauce.

Serving Suggestions
Now it’s time to think about how to serve your pâté. Here are some crowd-pleasing options perfect for scooping:
- Toasted baguette slices – A classic choice!
- Artisan crackers – like these Spelt Crackers and other whole grain, seed-based, or flavored options.
- Pickles and gherkins –The acidity cuts through the richness, making them a great match.
- Fruit slices – Fresh apple or pear slices make for an unexpected sweet meets savory pairing.
Planning a dinner party? Incorporate this pâté into a charcuterie board!
Start with a beautiful wooden board and arrange the pâté in the center, surrounded by any of the snacks and dippables listed above.
Don’t forget to include a selection of cheeses, nuts, dried fruit, and fruit preserves (like fig or apricot jam). Soft cheeses like Brie or goat cheese work exceptionally well!
Storing and Freezing
Storing: Store your chicken liver pâté in an airtight container in the refrigerator for 5-7 days.
The top of the chicken liver pâté discolors quickly when exposed to air. For this reason, it’s better to store it in glass jars rather than in containers with wide openings. You can also finish the top with clarified butter.
Freezing: Portion the pâté into freezer-safe containers or bags and keep frozen for up to 3 months. When ready to enjoy, thaw the pâté in the refrigerator overnight.
More Appetizers You’ll Love
Looking for more gourmet snacks and shareables? You’ll love these recipes:

Pashtet (Russian Chicken Liver Pâté)
Video
Ingredients
- 1 pound chicken livers
- 1½ Tbsp olive oil
- 1 onion (thinly sliced)
- 1 medium carrot (peeled and grated)
- ½ cup water
- 1 bay leaf
- ½ tsp salt
- ¼ tsp garlic powder
- ¼ tsp black pepper
- ⅛ tsp nutmeg
- 2 Tbsp unsalted butter
Instructions
- Soak the livers: Place the chicken livers in a bowl and cover them with cold water by at least one inch. Let them soak for at least 15 minutes.1 pound chicken livers
- Clean the livers: Rinse the livers under cold running water. Trim off any discolored or tough bits as well as connective tissue. Set aside.
- Cook the vegetables: In a sauté pan, heat the olive oil over medium-high heat. Add the onion and cook for 2–3 minutes, until it begins to caramelize. Add the carrot and cook for another 2 minutes, until slightly softened.1½ Tbsp olive oil, 1 onion, 1 medium carrot
- Cook the livers: Push the vegetables to the edges of the pan and place the chicken livers in the center. Fry, turning frequently, until they start to brown—about 2–3 minutes.
- Simmer: Stir the livers together with the vegetables. Add the water, bay leaf, salt, garlic powder, black pepper, and nutmeg. Mix well, reduce the heat, cover, and simmer for about 10-15 minutes, stirring occasionally, until the livers are fully cooked.½ cup water, 1 bay leaf, ½ tsp salt, ¼ tsp garlic powder, ¼ tsp black pepper, ⅛ tsp nutmeg
- Blend: Discard the bay leaf. Transfer the mixture to a bowl. Add the butter, then blend with an immersion blender until smooth and creamy. Alternatively, let the mixture cool slightly, then transfer it to a blender or food processor and puree until smooth.2 Tbsp unsalted butter
- Chill: Transfer the pashtet to a jar or an airtight container. Top with clarified butter if desired. Cover and refrigerate for at least 4 hours, or overnight, to allow the flavors to develop.
- Serve: Enjoy chilled or at room temperature, spread on slices of bread or toast.
Recipe Notes
- Clean the livers thoroughly, removing discolored parts and connective tissue to prevent bitterness.
- Cook just until tender—overcooking can make the pâté grainy.
- Blend well for a smooth texture; push through a fine mesh sieve for an ultra-creamy result.
- Chill for at least 4 hours or overnight to let flavors meld and the pâté thicken.
Storing & Freezing
- Storing: Keep the pâté in an airtight container in the refrigerator for 5-7 days. Store in jars to minimize exposure to air. To prevent discoloration, top with clarified butter.
- Freezing: Portion into freezer-safe containers or bags and freeze for up to 3 months. Thaw in the refrigerator overnight.
How to Make Clarified Butter
- Melt unsalted butter gently over low heat.
- Skim off the foam from the top.
- Let it sit so the milk solids sink to the bottom.
- Let the pâté cool slightly.
- Gently spoon or pour a thin, even layer of warm clarified butter over the surface of the pâté (about 1/8 to 1/4 inch thick).
The nutrition facts are an estimate. Variations in ingredient brands, portion sizes, or substitutions can affect the final nutritional values. For the most accurate information, please use a nutrition calculator or consult with a healthcare provider. Always ensure that each of the ingredients is allowed in your diet.

Meet Maria
Maria Ushakova is a holistic nutritionist and food blogger. She focuses on developing easy recipes using real food ingredients. She believes that healthy food is delicious and anyone can learn how to cook it. Maria’s work has appeared on numerous popular websites as well as in print.


This was an easy and delicious recipe. Thank you for sharing!