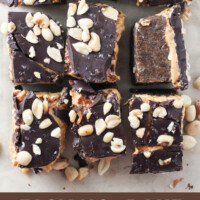
These easy, no-bake Prune Bars are a naturally sweet, fiber-packed treat made with simple ingredients like prunes, almond flour, coconut oil, peanut butter, dark chocolate, and roasted peanuts.
Perfect as an energizing snack and a nutritious dessert.

Let’s be real: prunes aren’t exactly the it ingredient in most kitchens.
However, those little dried plum gems are capable of so much more than they get credit for. That’s where this healthy prune bar recipe comes in.
Within these perfectly layered bars, you get a soft, chewy, naturally sweet base made from pureed prunes, almond flour, and coconut oil, a creamy peanut butter middle, a decadent dark chocolate shell, and a sprinkle of crunchy peanuts and flaky salt to finish things off.
Why You’ll Love This Recipe
Let’s take a closer look at why these homemade energy bars deserve a spot in your healthy snack and dessert rotation, starting with the impressive nutritional perks the underrated prune has to offer:
- Rich in fiber: Supports digestion and promotes regularity.
- Natural source of antioxidants: Can help fight inflammation and oxidative stress.
- Good source of potassium: Important for heart health and muscle function.
- Naturally sweet: Helps reduce the need for added sugars.
Beyond the prune’s nourishing contribution, here’s what else you can expect from this recipe:
- No-bake and easy to make: Failproof treat you can actually feel great about eating.
- Keeps well in the fridge or freezer: Great for make-ahead snacks/ desserts.
- Highly customizable: Easy to adapt with different nut butters, toppings, dried fruits, etc.
- Smart way to eat more prunes: Especially if you aren’t usually a fan.
Ingredient Notes
Here’s everything you need to make these irresistible, homemade prune bars:

Here is a brief overview of the ingredients:
- Pitted prunes—AKA dried plums. These give the bars their chewy, sticky base and natural sweetness.
- Almond flour—I used almond flour in the base to keep things grain-free and gluten-free. The subtle nuttiness also complements the prunes perfectly.
- Coconut oil—Melted coconut oil adds richness and helps the bars properly set in the fridge.
- Peanut butter—Peanut butter adds a salty-sweet creamy layer. Natural, creamy peanut butter with just peanuts (and maybe a little salt) works best.
- Dark chocolate—For the luxurious topping, I use dark chocolate with at least 70% cocoa (ideally fair trade or organic chocolate). If you’re avoiding all added sugars, sugar-free dark chocolate is a suitable alternative.
- Peanuts—Sprinkling salt-roasted peanuts on top contrasts beautifully with the creamy, chewy textures.
- Coarse salt—A pinch of flaky sea salt does wonders. Don’t skip it!
How to Make Homemade Prune Bars
This recipe is totally doable for anyone. Just follow these simple instructions:
Step 1. Prepare the base.
In a food processor or blender, combine the prunes, almond flour, and coconut oil. Pulse a few times, then blend until the mixture turns into a thick, uniform paste.


Step 2. Assemble the layers.
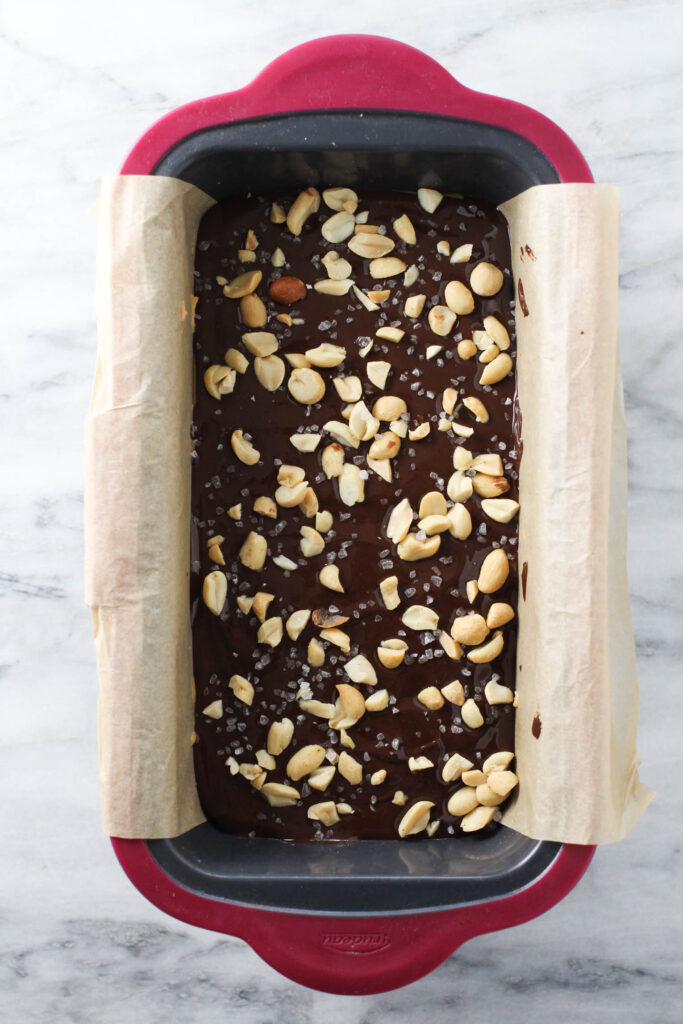
Line a loaf pan with parchment paper. Spread the prune mixture on the bottom, pressing it down into an even, compact layer, followed by a layer of peanut butter.


Step 3. Finish the topping.
Melt the chocolate until smooth. Pour the melted chocolate over the peanut butter layer, spreading it evenly to the edges.
Sprinkle chopped peanuts and salt over the top, lightly pressing them into the chocolate.

Step 4. Chill, slice, and serve.
Place the pan in the fridge and let it chill until the layers are fully set. Slice into bars or squares.


Recipe Video
Here is the recipe video to help you make the bars:
Recipe Tips
This recipe is a breeze, but a few tips can make all the difference. Here’s everything you need to know to get your bars just right:
- Use soft, moist prunes: Dry prunes won’t blend as smoothly and can result in a grainy texture. If your prunes feel firm or leathery, soften them in hot water for 5-10 minutes before blending.
- Consistency matters: When blending the prunes, almond flour, and coconut oil, you’re looking for smooth, sticky dough that holds together when pressed. If it’s too crumbly, add a bit more coconut oil. If it’s too wet, pulse in additional almond flour until it firms up.
- Warm up the peanut butter: If your peanut butter is thick or refrigerated, warm it slightly (10-15 seconds in the microwave) to make it easier to spread and help it meld better with the base layer and the chocolate.
- Don’t rush the chill time: To ensure well-defined layers, leave the bars in the fridge for at least two hours (or overnight) before slicing.
- Flip to slice: It’s easier to cut the soft prune layer than the chocolate layer. So, place the chilled block on a cutting board the chocolate layer facine down, and slice it with a sharp knife.

Variations
One of the things I love most about this prune recipe is how easily it can be customized. Here are some ideas to get you started, but feel free to let your creativity run wild!
- Prune alternatives: Soft Medjool dates are the best swap for prunes, as they have a similar sticky texture and natural sweetness.
- Peanut-free option: For a peanut-free alternative, creamy almond butter or cashew butter also pairs well. For the crunchy topping, try almonds, walnuts, or pecans.
- Extra layer of crunch: For more texture, try sprinkling puffed quinoa, crispy rice cereal, or even crushed pretzels over the peanut butter before pouring the chocolate on top.
Storing
Storing: Homemade prune bars are best kept chilled in an airtight container in the fridge for up to 1 week.
Freezing: They also freeze beautifully in a freezer-safe container (with parchment paper between layers to prevent sticking) for up to 3 months. When you’re ready to eat one, just let it soften at room temperature for a few minutes.
FAQs
More No-bake Recipes
If you loved these peanut butter chocolate prune bars, you’ll want to try these no-bake healthy dessert recipes next:

Prune Bars with Peanut Butter and Chocolate
Video
Equipment
- Food Processor (or blender)
Ingredients
- 2 cups pitted prunes (see the notes)
- 1 cup almond flour
- ¼ cup coconut oil (melted)
- ½ cup peanut butter
- 3½ oz (100 grams) dark chocolate
- 2 Tbsp peanuts (roasted and chopped)
- ½ tsp coarse salt
Instructions
- Prepare the base: In a food processor or blender, add the prunes, almond flour, and coconut oil. Pulse a few times, then blend until the mixture forms a smooth, uniform paste.2 cups pitted prunes, 1 cup almond flour, ¼ cup coconut oil
- Prepare the pan: Line a loaf pan with parchment paper, leaving some overhang for easy removal.
- Assemble the layers: Spread the prune mixture evenly over the bottom of the prepared pan. Then, add a layer of peanut butter on top of the prune layer.½ cup peanut butter
- Melt the chocolate: Melt the chocolate in the microwave in short bursts, stirring in between, or use a double boiler on the stovetop.3½ oz dark chocolate
- Finish the topping: Pour the melted chocolate over the peanut butter layer and spread it evenly. Sprinkle chopped peanuts and salt over the top. Press the nuts lightly into the chocolate to help them stick.2 Tbsp peanuts, ½ tsp coarse salt
- Chill: Place the loaf pan in the refrigerator for at least 2 hours, or until fully set.
- Slice and serve: Once firm, remove from the fridge. Lift the block out using the parchment paper. Remove the paper, then slice into bars or squares.
Recipe Notes
- Use soft, moist prunes: Dry prunes won’t blend well. Soak firm, dry prunes in hot water for 5–10 minutes. Then drain and pat dry with a paper towel.
- Check the dough consistency: Blend the prunes, almond flour, and coconut oil until smooth and sticky. Too crumbly? Add coconut oil. Too wet? Add more almond flour.
- Warm the peanut butter: If thick or cold, microwave for 10–15 seconds to soften for easier spreading.
- Chill thoroughly: Refrigerate the bars for at least two hours (or overnight) before slicing.
- Flip to slice: Place the chilled block on a cutting board with the chocolate layer facing down, and use a sharp knife to slice it.
Storing
- Storage: Keep homemade prune bars in an airtight container in the fridge. They’ll stay fresh for up to 1 week.
- Freezing: Freeze in a freezer-safe container with parchment paper between layers to prevent sticking. They’ll keep for up to 3 months. To serve, let them sit at room temperature for a few minutes to soften.
The nutrition facts are an estimate. Variations in ingredient brands, portion sizes, or substitutions can affect the final nutritional values. For the most accurate information, please use a nutrition calculator or consult with a healthcare provider. Always ensure that each of the ingredients is allowed in your diet.

Meet Maria
Maria Ushakova is a holistic nutritionist and food blogger. She focuses on developing easy recipes using real food ingredients. She believes that healthy food is delicious and anyone can learn how to cook it. Maria’s work has appeared on numerous popular websites as well as in print.