
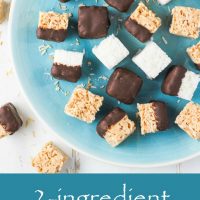
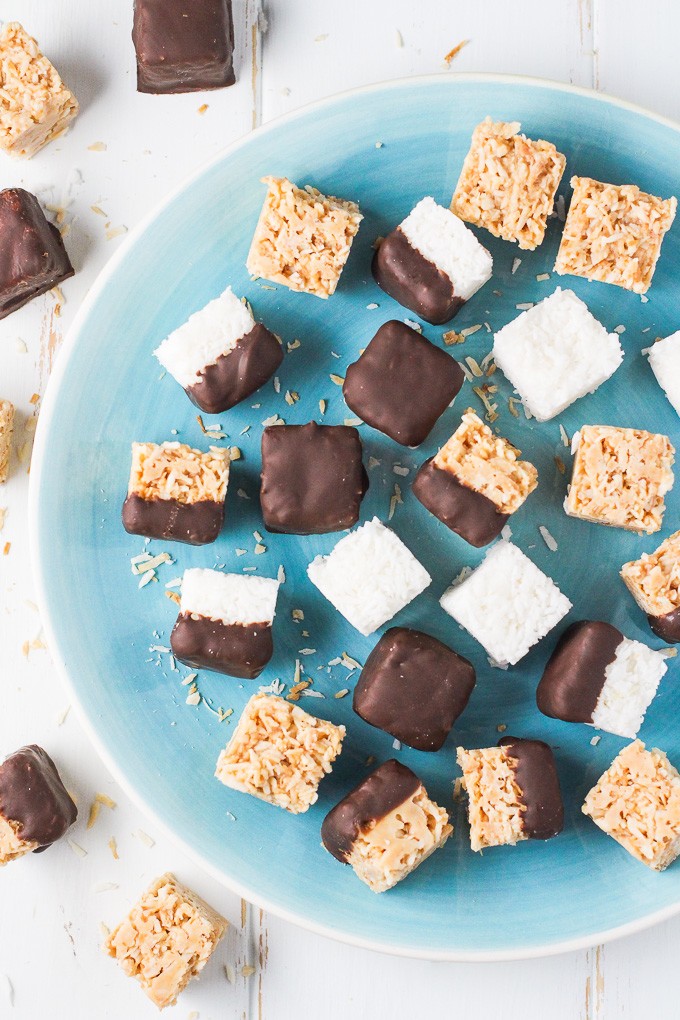
These healthy coconut bites are made with only two simple ingredients – shredded coconut and chocolate. And even better, there is an option to make them using only one ingredient instead of two.
If you prepare them without chocolate, you will only need shredded coconut.
The coconut bites without chocolate make a pure coconut snack with no added sugar, perfect for snacking throughout the day.
If you dip them into melted chocolate, you will get a light dessert that is perfect for satisfying a chocolate craving.
The chocolate-covered variation has a bit more sugar from the rich dark chocolate but is still better than most chocolate coconut bars out there.
And you can also make these coconut bites using toasted coconut, which adds wonderful caramel flavor.
If you are like me and can’t decide which one you prefer, just make all three! Each option serves a different purpose, and the easy snack will last a few weeks in the fridge.
The Story
I first posted this recipe in June of 2015. The recipe quickly became popular, and many people loved the little bites.
However, the instructions confused some people, so I made the step-by-step pictures. I also improved the process of shaping the coconut bites.
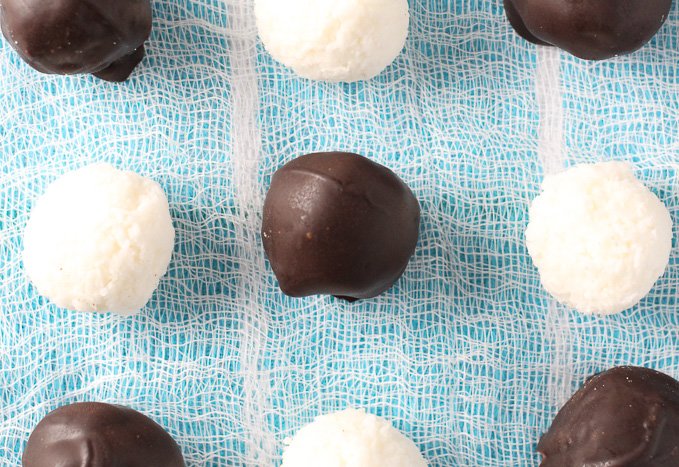
Initially, I shaped each one by hand and made them round. The coconut balls were delicious, but the process was time-consuming, and the coconut mixture would sometimes fall apart. The original coconut bites looked like this:
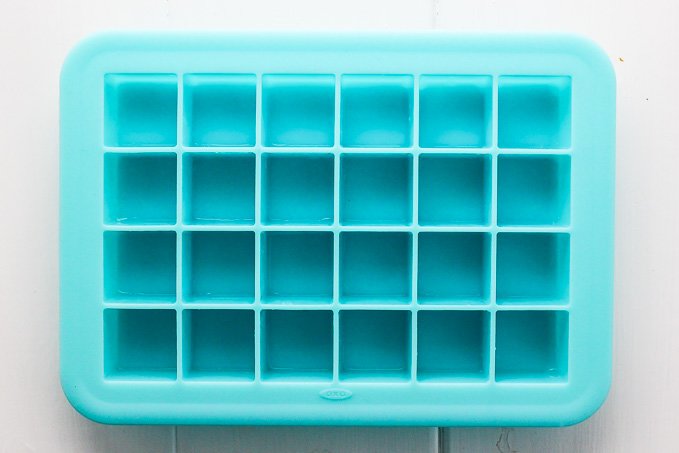
Now, I use a silicone ice cube tray to shape the coconut bites, and it’s really easy to do.
So, two years later, in June of 2017, I posted the new step-by-step photos and the updated instructions. I also added a new flavor variation made with toasted coconut.
What You’ll Need
Here are the ingredients and equipment you’ll need to make coconut bites:
Ingredients:
- Unsweetened shredded coconut – Check the ingredient list to make sure that there is only one ingredient listed and the product doesn’t contain any hidden additives.
- 70% dark chocolate – A quality bar of dark chocolate works best for the rich chocolate flavor. I do not recommend using chocolate chips as they contain stabilizers, so they do not melt smoothly.
Tools:
- A food processor or a high-end/high-quality blender – Make sure it can make nut butter. Please note that a regular blender can’t be used to make these coconut bites. When in doubt, check with the manufacturer.
- A silicone ice cube tray with 24 small cubes or a similar mold – If you don’t have a silicone ice cube tray, you can still make the coconut bites using a measuring spoon which is 1/2 tablespoon in size. It will take longer, but it’s possible. This was my original method of making the coconut bites, and I had been doing it that way for almost two years. The technique is described in detail in the recipe section below.
How to Make Coconut Bites
The process of making these coconut bites consists of three steps.
First, make the coconut paste, a.k.a coconut butter. Then mix the coconut paste with the shredded coconut. Lastly, shape the coconut bites using a silicone ice cube tray or a measuring spoon.
There is also an optional step of coating the coconut bites with melted chocolate.
All the steps are described below and illustrated with step-by-step pictures.
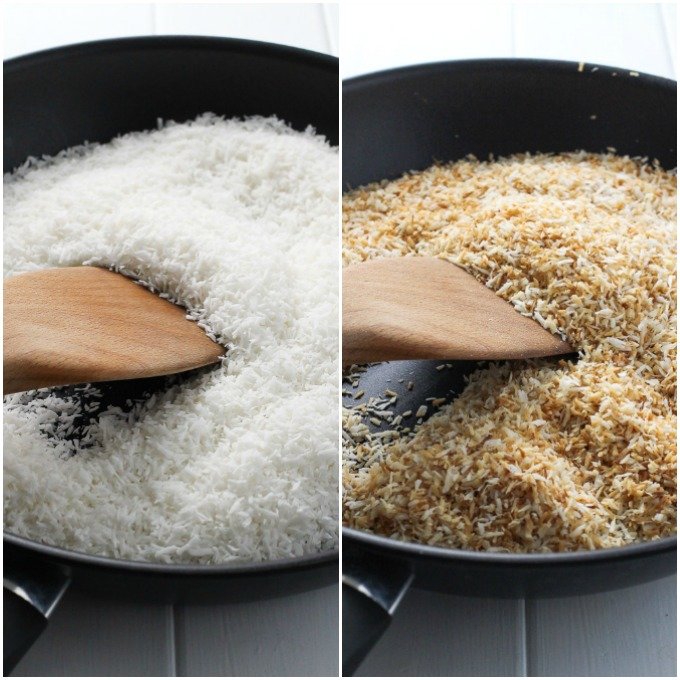
Step 1. Make coconut paste (a.k.a coconut butter)
I received a lot of questions about this step of the recipe.
So to clarify the instructions and give you an idea of how the coconut paste looks as it’s being processed, I took pictures of the paste at each stage.
I also listed the processing time at the bottom right corner of each picture (see the image below).
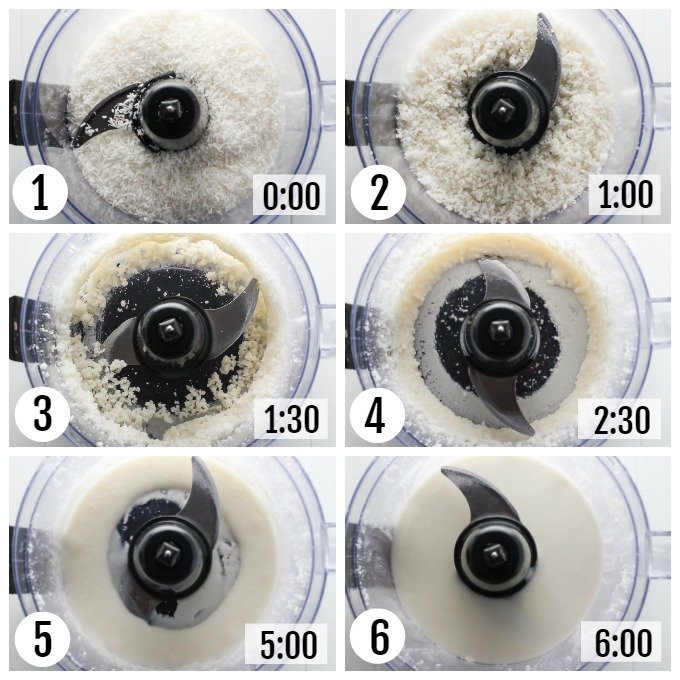
The instructions:
- Place the shredded coconut into the food processor. Set a timer for 6 minutes and start processing.
- After about 1 minute, the shredded coconut will start clumping together. It’s a great start; keep processing.
- At the 1 minute 30 seconds mark, the coconut mixture will start sticking to the walls of the food processor bowl. Stop the food processor and scrape the coconut paste down with a spatula. Close the food processor and keep processing.
- At the 2 minutes 30 seconds mark, the paste will start getting more liquid. Stop the processor and scrape the walls with a spatula. Don’t forget to scrape the white layer that forms at the bottom of the food processor bowl.
- Between 2:30 minutes and 5 minutes, keep processing the paste but make sure to stop and scrape the paste down with a spatula as needed. At the 5-minute mark, the paste will be almost liquid. Give it one last swirl.
- At the 6-minute mark, you should have a runny paste that will appear smooth but will have a slightly grainy texture.
Please note that the timing may vary depending on many factors, such as the power of the food processor, the sharpness of the blade, the quality of the shredded coconut, the amount of shredded coconut, room temperature, etc.
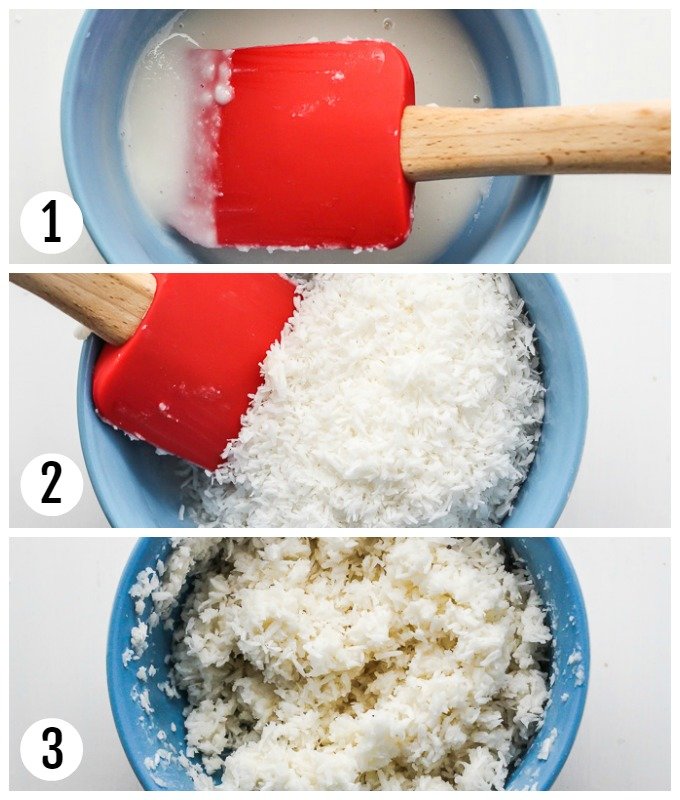
Step 2. Make coconut mixture
- Once the coconut paste is ready, transfer it to a mixing bowl.
- Add the shredded coconut and mix well until the shredded coconut starts to clump together.
Step 3. Shape coconut bites
The easiest and fastest way to shape the coconut bites is using a silicone ice cube tray.

The instructions:
- Scoop about half of the coconut mixture onto the silicone ice cube tray.
- Press the mixture into the molds using your fingers.
- Add the rest of the coconut mixture.
- Distribute it equally between the molds and press tightly. Place the ice tray in the fridge for about 2 hours.
- Once the coconut bites firm up, gently bend the ice tray to loosen them up until the coconut bites pop out.
Please note that it’s also possible to shape the coconut bites using a measuring spoon. The method is described in the recipe section below.
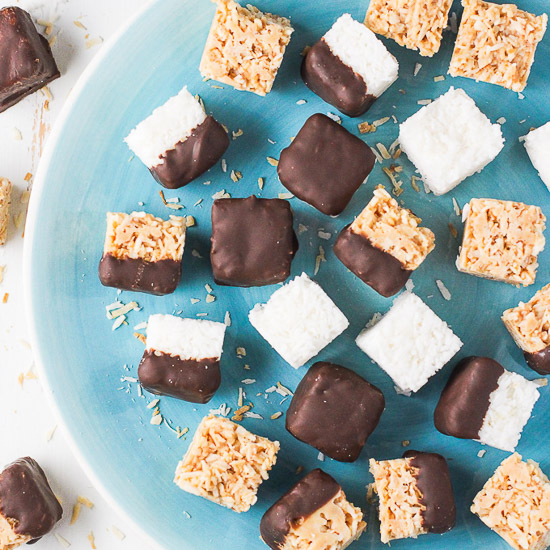
Healthy Coconut Bites – 3 Ways
Here is how to make healthy coconut bites in three flavor variations:
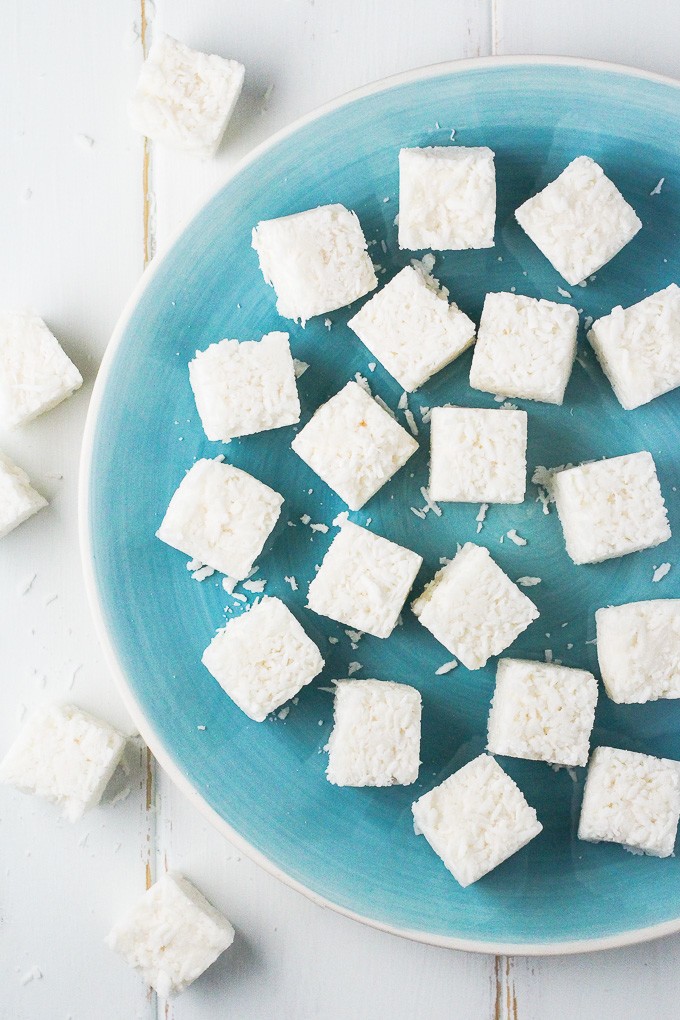
1. Sugar-Free Coconut Bites (1 ingredient)
These 1-ingredient coconut bites make a great healthy snack. They are sugar-free and perfect if you are looking for a low-glycemic option.
2. Sugar-Free Toasted Coconut Bites (1 ingredient)
These sugar-free toasted coconut bites are another tasty low-glycemic option.
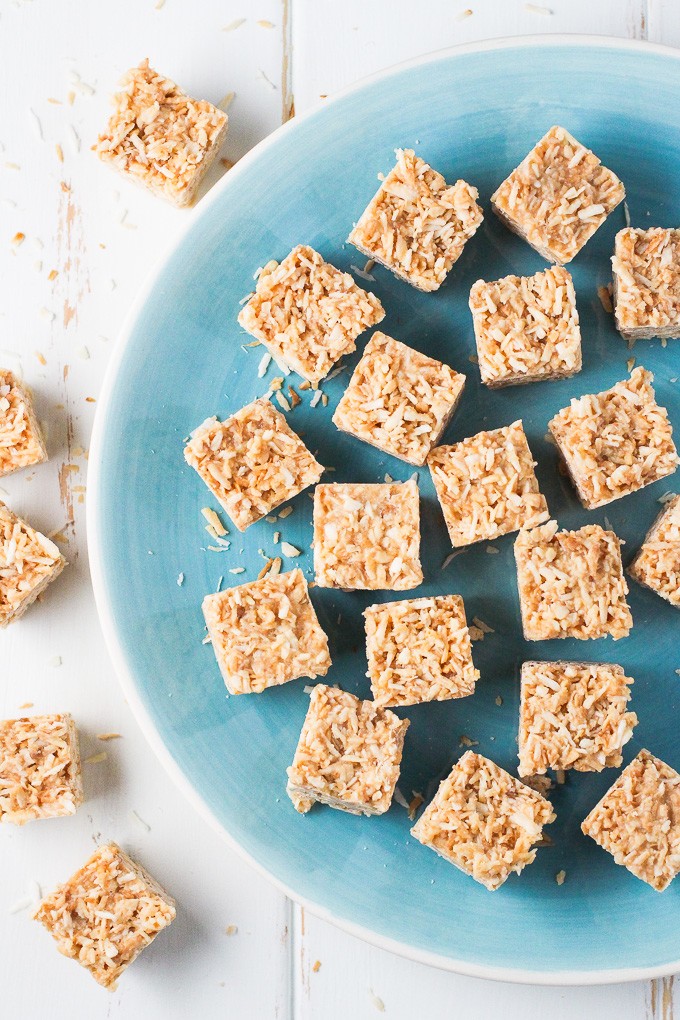
They are made exactly like the plain white coconut bites just using toasted shredded coconut.
You can easily toast plain shredded coconut on the stovetop. Takes about 5 minutes.
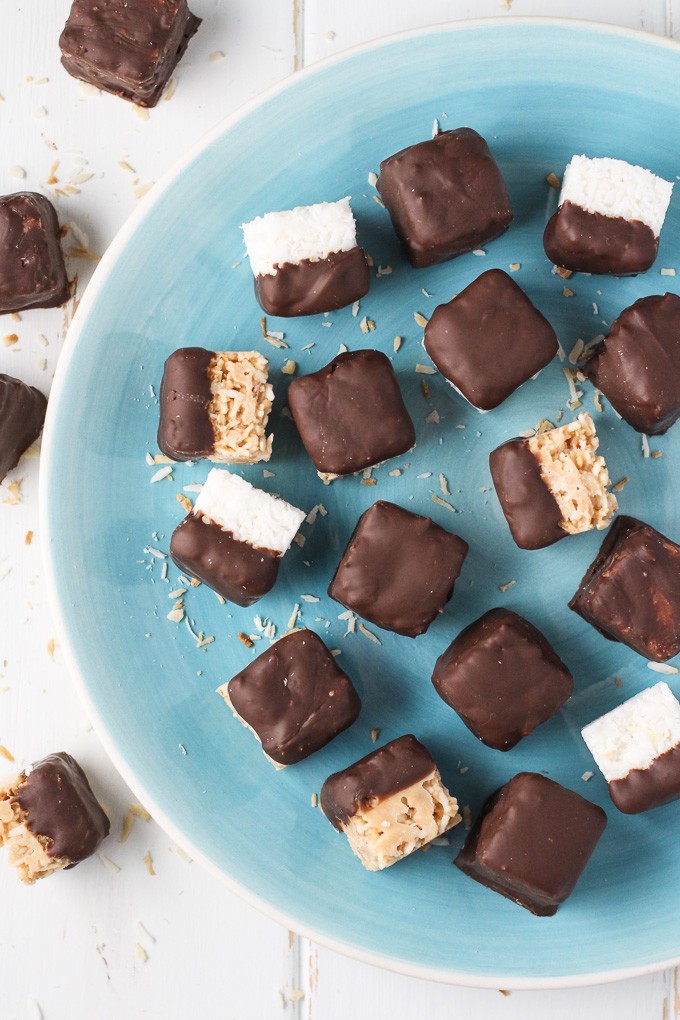
3. Chocolate Coated Coconut Bites (2 ingredients)
Make chocolate coconut bites by dipping the unsweetened coconut bites into melted chocolate to create a perfect sweet treat.
You can fully coat the coconut bites or just dip them halfway to keep the sugar content low.
Storing
Store these coconut energy bites in an airtight container in the fridge for up to 4 weeks.
More Healthy Snack and Dessert Recipes
If you are looking for more healthy, low-sugar snack and dessert ideas, check out these recipes:
- Carob Prune Truffles
- Almond Flour Chocolate Cookies
- Chocolate Ice Cream without Eggs
- Chocolate Mousse Without Eggs
- Eggless Chocolate Cupcakes
Healthy 2-Ingredient Coconut Bites
Equipment
- Food Processor (or a high-powered blender)
Ingredients
- 2½ cup unsweetened shredded coconut
- 100 gr dark 70% chocolate
Instructions
To make the coconut paste:
- Place 1½ cups of the shredded coconut into the food processor, pulse a few times, and process for about 6 minutes until you have a smooth paste whith a slightly grainy texture. Scrape the walls of the food processor bowl with a spatula as needed.
To make the coconut mixture:
- Transfer the paste to a bowl. Add the remaining 1 cup of the shredded coconut and mix until combined.
To shape the coconut bites using a silicon ice cube tray:
- Scoop about a half of the coconut mixture onto the silicon ice cube tray.
- Press the mixture into each cell using your fingers.
- Add the rest of the coconut mixture.
- Distribute the mixture equally between the cells and press tightly. Place the ice tray in the fridge for about 2 hours.
- Once the coconut bites firm up, start gently bending the ice tray to loosen them up until they pop out.
To shape the coconut bites using a measuring spoon:
- Place the bowl with the coconut mixture in the fridge for 15 to 20 minutes.
- Cover a baking sheet with parchment paper.
- To shape the coconut bites, use a measuring spoon with a ½ tablespoon capacity to scoop the coconut mixture. Press the mixture firmly into the spoon with your thumb, and pop out the coconut bite. They will have a shape of half a ball. Place the coconut bites on the parchment paper with the flat side down. Once you have shaped all the coconut balls, place them in the fridge for about one hour until firm.
For the 1-Ingredient Sugar-Free Coconut Bites:
- Make the coconut paste.
- Mix the coconut paste with the rest of the shredded coconut to make the coconut mixture.
- Shape the coconut mixture using the preferred method.
For the 1-Ingredient Sugar-Free Toasted Coconut Bites:
- To toast the shredded coconut, pour all the shredded coconut into a skillet and start warming it up over medium heat. Make sure to always stir the coconut with a wide wooden spoon. After about one minute, the coconut will become fragrant and begin changing color.
- Toast the coconut until golden brown for about 5 minutes. Once the coconut is toasted, transfer it to a plate right away (it will continue toasting and may burn if left on a hot skillet). Let the coconut cool slightly and then pour it into the bowl of a food processor.
- Make the coconut paste.
- Mix the coconut paste with the rest of the coconut.
- Shape the coconut bites using the preferred method.
For the chocolate covered coconut bites:
- Make the plain or toasted version above.
- Melt the dark chocolate. Dip the coconut bites halfway into the melted chocolate or, using two forks, dip them fully into the chocolate to cover. Place the chocolate-covered coconut balls back on the parchment paper.
- Once all the coconut balls are covered in chocolate, place them in the fridge. Refrigerate for 1 to 2 hours until the chocolate has set.
Recipe Notes
- Please refer to the blog post for the step-by-step photos.
- These coconut bites can be stored in the fridge for a few weeks.
- The nutrition information is a rough estimate for 1 of 24 chocolate-covered coconut bites.
The nutrition facts are an estimate. Variations in ingredient brands, portion sizes, or substitutions can affect the final nutritional values. For the most accurate information, please use a nutrition calculator or consult with a healthcare provider. Always ensure that each of the ingredients is allowed in your diet.

Meet Maria
Maria Ushakova is a holistic nutritionist and food blogger. She focuses on developing easy recipes using real food ingredients. She believes that healthy food is delicious and anyone can learn how to cook it. Maria’s work has appeared on numerous popular websites as well as in print.


Love the idea of using the ice cube tray. Genius!
This recipe is genius! I didn’t know you could blitz coconut into this kind of deliciousness and I love that you used an ice cube tray!
Ooh!! These look like little bites of tropical goodness!
Love the idea of using the ice cube tray. Genius!
These are incredible! Like mini bounty bar bites!
Thank you for the recipe 😀
You had me at coconut. These look absolutely delicious!
This recipe is genius! I didn’t know you could blitz coconut into this kind of deliciousness and I love that you used an ice cube tray!
These are incredible! Like mini bounty bar bites!
Thank you for the recipe 😀
You had me at coconut. These look absolutely delicious!
Such a creative idea to use a silicon ice cube tray to shape the coconut bites! these look so delectable
Hi there. Love the recipe. Must we keep this on the fridge at all times? How long out of the fridge can it withstand?
Hi there! It depends on the room temperature. Coconut oil starts to melt around 24 C / 76 F, so if it’s close to this temperature, the coconut bites will become softer and might fall apart if they are not fully coated in chocolate. If it’s cool, they will be just fine out of the fridge.
Thanks. Will give it a try.
I am currently working on an updated version of this recipe which will be posted in a few days. It will include new step-by-step pictures and the simplified instructions as well as an option to make the coconut bites using toasted coconut. If you want to wait a couple of days, I can let you know once it’s out.
These were delicious however I had a hard time making the paste. I tried three different blenders/food processor and for about 20-30 minutes. As a matter of fact I ran one blender so long it burned up. Please help me for the next time.
Hi there! Sorry for the late reply as I had to take some time away from my blog due to family emergency. When you are making the paste, you are essentially making coconut butter. Here is an article that explains in detail how to make coconut butter in a blender or food processor: http://www.thekitchn.com/how-to-make-coconut-butter-cooking-lessons-from-the-kitchn-166405
Also keep in mind that shredded coconut can sometimes dry out in the package. In this case, it helps to add a little bit of melted coconut oil. Start with about ½ tablespoon. If you have difficulty forming the balls, make sure that the mixture is cool enough as you would use the warmth of your hands to sort of melt the balls a bit to create the desired shape. I hope this helps.
Thank you for sharing the Kitchn article on coconut butter! I tried making these last night and ended up with a sandy mixture that will never in a million years be manipulated into ball shapes, lol. I’m curious how you were able to make the paste in just 4-6 minutes; the Kitchn article says to blend/process for nearly 20 minutes! I was definitely unable to make the paste in 6 minutes of processing.
Hi, Katie! I’ve noticed the difference in the processing time. I make these very often and I’ve never had to process it for that long, maximum 8 minutes. I think it depends on the quality of the shredded coconut and the power of your food processor. Also, they are making coconut butter to be consumed as butter, but for the purpose of making the snack, it’s fine if the paste is a bit grainy because you are going to mix it with the rest of the shredded coconut anyways and the grains won’t be noticeable. The trick is to place the mixture in the fridge otherwise you won’t be able to shape the balls.
I recently started shaping them into half balls instead of trying to make them super round. I just push them into a measuring spoon, press, and pop them out. I find it takes less time and if I am making them just for us to eat the shape is not that important. Also, sometimes shredded coconut can dry out in the package. In that case, I add a couple of tablespoons of melted coconut oil.
Let me know if you have any other questions. I am planning to update this post and make step-by-step photos, so I am interested to know what questions people have when making these.
I love that these are healthy, sweet and simple to make! I can’t wait to make them!
Thank you, Cassandrea! Let me know if you try them 🙂