
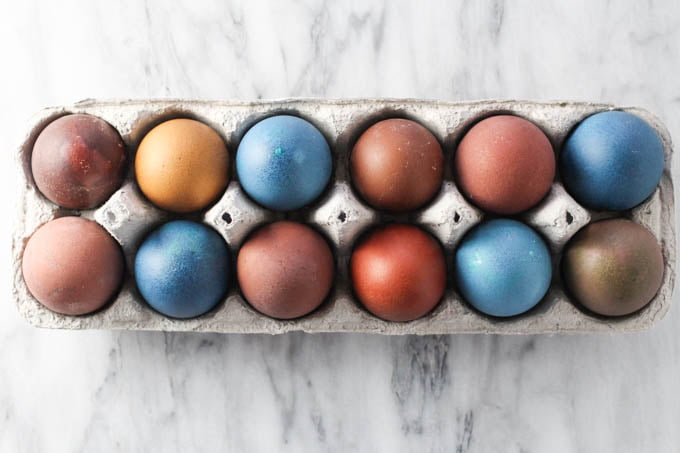
Decorating Easter eggs is a fun activity for kids and adults.
In this post, I am showing you how you can dye eggs naturally using food scraps.
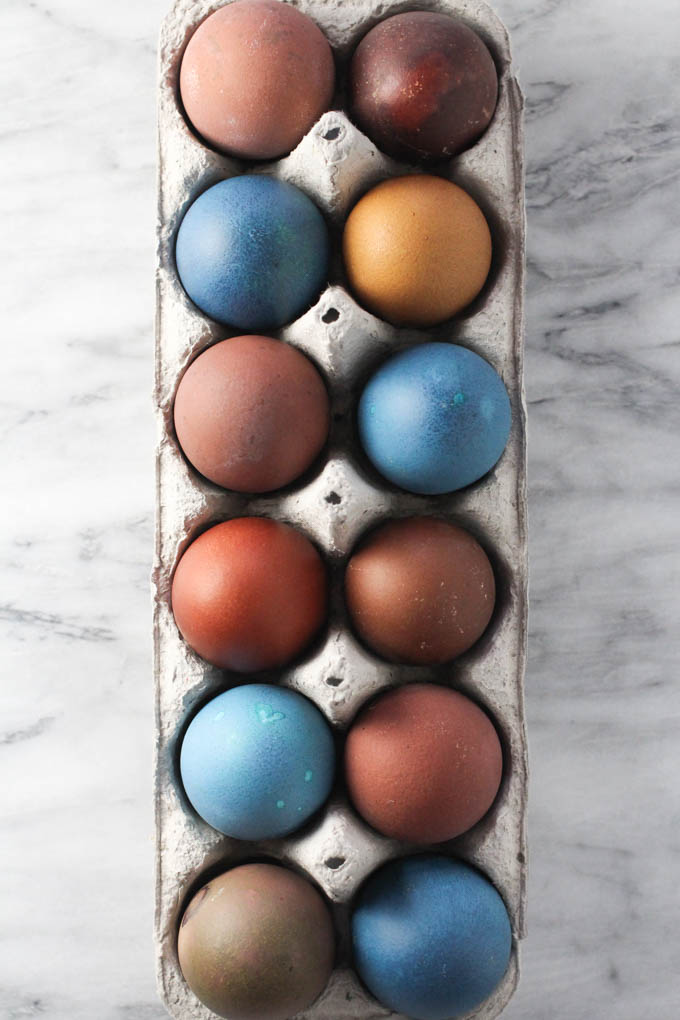
No need to buy egg coloring kits with artificial colors or use foods that you could eat.
All you need are food scraps that you would normally throw out or put into the compost pile.
This is a great way to save money, celebrate Easter on a budget, reduce waste, and learn more about food.
What You’ll Need:
Dyeing eggs for Easter is quite easy, but it can be messy, so it’s better to have everything ready before you start:
Ingredients for The Dyes:
- red onion skins (only the dry parts) for the Red Onion Dye;
- black rice for the Black Rice Water Dye;
- red cabbage leaves for the Red Cabbage Dye;
- water;
- vinegar.
Tools:
- a cooling rack;
- gloves;
- paper towels;
- stainless steel saucepans or pots;
- glass bowls, containers, or jars;
- tongs or a slotted spoon;
- a mesh strainer;
- measuring spoons.
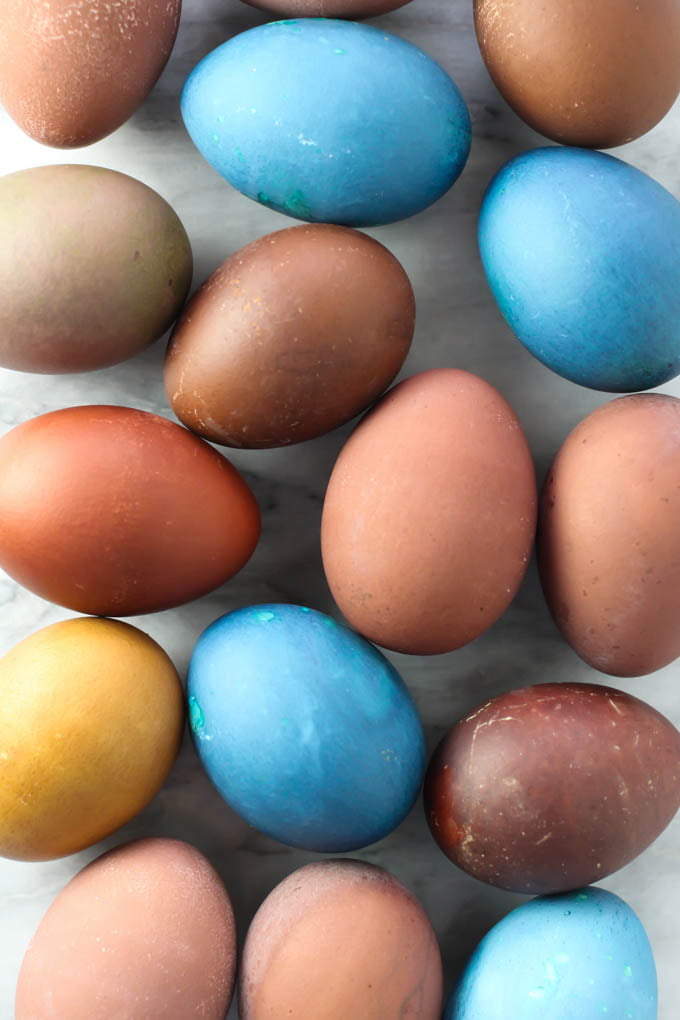
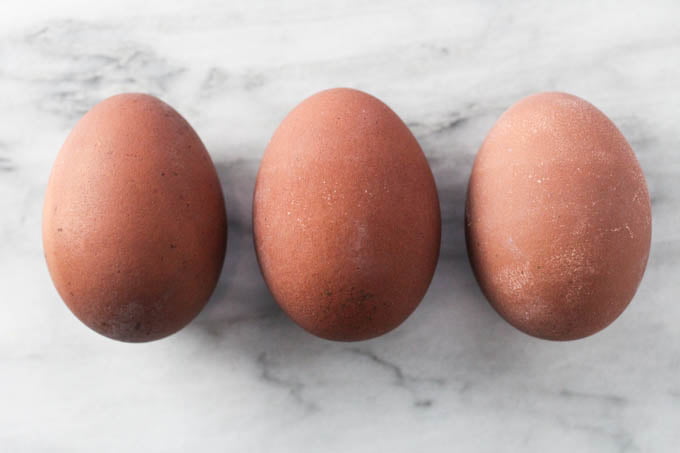
Should You Dye White or Brown Eggs?
You can dye either white or brown eggs.
The color might, of course, vary, but it’s fun to experiment with. I dyed only white eggs to make the pictures for this blog post.
Do You Have to Boil Eggs First to Dye Them?
Raw eggs can be cooked directly in the Red Onion Dye and Black Rice Water Dye. However, the eggs cooked in the dye will have a lighter color.
You will need to hardboil the eggs first for dyeing in the Red Cabbage Dye. In my experience, the color doesn’t stick when the eggs are cooked in the Red Cabbage Dye.
If you boil the eggs in the dye but aren’t happy with the color, you can always soak them in the dye bath to get a deeper, brighter color.
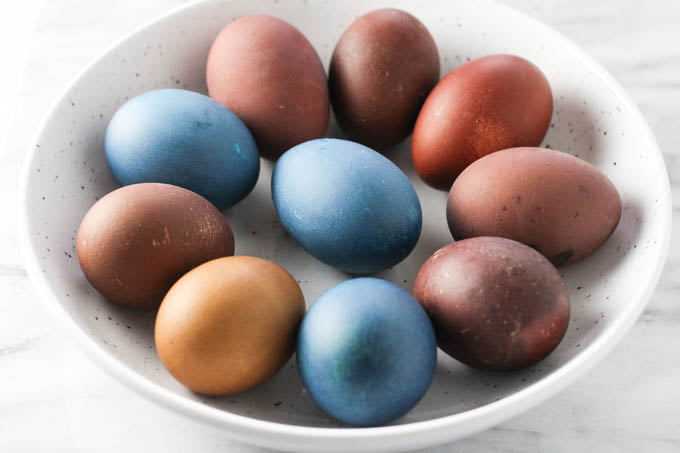
How to Dye Easter Eggs with Food Scraps
Below you will find detailed instructions on how to make natural dyes at home and how to color the eggs.
If you scroll down to the end of this blog post, you’ll find a printable recipe card so you can print it and take it with you into the kitchen.
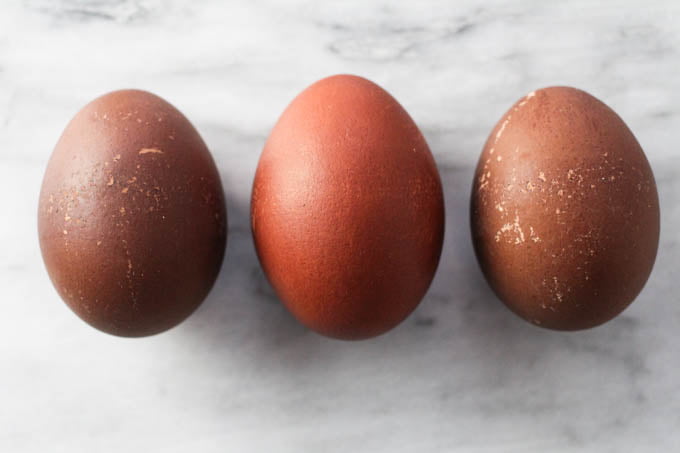
How to Dye Eggs with Red Onion Skins
When you use red onions for cooking, save the peels (only the dry bits) and store them in a bag wherever you store your onion until it’s time to dye the eggs.
You can also ask at the produce department of your grocery store to give you some. They always have plenty of onion peels because dry onion skins naturally fall off when being handled.
You can also dye eggs using skins of regular yellow onions, but I prefer the color I get with the red onion skins.
The Ingredients for the Red Onion Dye:
- 6 cups of water
- 3 generous handfuls of red onion skins (only the dry parts)
- 2 Tbsp vinegar
How to Make the Dye:
- Add the water and onion skins into a saucepan. Bring to a boil. Reduce heat, cover, and let it simmer for about 15 minutes. Turn off the heat and let the liquid cool completely.
- With a slotted spoon, remove and discard the onion skins. Filter the liquid if needed. Add two tablespoons of white vinegar.
How to Color the Eggs:
The Red Onion Dye can be used in two ways.
You can cook the eggs in the dye or soak hardboiled eggs in the dye for four hours or overnight. Keep in mind that soaked eggs will be much brighter than the eggs cooked in the dye:
- To cook the eggs in the dye, add the dye and the eggs to a stainless steel saucepan. Make sure the eggs are completely submerged in the liquid. You can add some water if needed. Bring the water to a boil and cook the eggs for 12 minutes. Using the tong or a slotted spoon, carefully remove the eggs from the water and place them onto a cooling rack to cool.
- To soak the eggs in the dye, add the dye to a glass bowl. Add hardboiled eggs. Make sure the eggs are completely submerged in the liquid. You can add some water if needed. Place the bowl into the refrigerator and soak the eggs for 4 hours or overnight. Remove the eggs from the dye and place them on a cooling rack to let them dry.
How to Dye Eggs with Black Rice Water
Black rice is a popular whole grain alternative to white and brown rice. If you’ve never tried black rice, check out my Complete Guide to Cooking Black Rice.
There are a few different ways you can cook black rice, and one of the methods is called the ‘pasta method.’ This technique requires the grain to be cooked just like pasta in a large amount of water. When the grain is cooked, the water is discarded.
But if you save the water, you can make the black rice water egg dye, which produces the most beautiful eggs in various taupe shades.
If you like black rice but use other methods to cook it, give the pasta method a try. And if you already cook black rice this way, just save the black rice water next time you cook it and freeze until it’s time to dye the eggs.
Ingredient for the Black Rice Dye:
- 1 cup black rice
- 6 cups water
- 2 Tbsp vinegar
How to Make the Dye:
- Rinse the black rice and place it into a saucepan. Add 6 cups of water. Bring the water to a boil. Reduce the heat and cook until rice is soft but chewy, for about 30 to 35 minutes.
- Place a mesh colander over a pot or heat-resistant bowl. Strain the black rice and use it as you would normally use cooked black rice.
- Let the rice water cool down to room temperature. Add two tablespoons of vinegar and mix.
How to Color the Eggs:
The Black Rice Dye can be used in two ways.
You can cook the eggs in the dye, or you can soak hardboiled eggs in the dye for four hours or overnight. Soaked eggs will be slightly brighter than the eggs cooked in the dye:
- To cook the eggs in the dye, add the dye and the eggs to a stainless steel saucepan. Make sure the eggs are completely submerged in the liquid. You can add some water if needed. Bring the water to a boil and cook the eggs for 12 minutes. Using the tong or a slotted spoon, carefully remove the eggs from the water and place them onto a cooling rack to cool.
- To soak the eggs in the dye, add the dye to a glass bowl. Add hardboiled eggs. Place the bowl into the refrigerator and soak the eggs for 4 hours or overnight. Remove the eggs from the dye and place them on a cooling rack to let them dry.
How to Dye Eggs with Red Cabbage
Red cabbage is a nutrition powerhouse. If you don’t already include it in your menu, check out this Braised Red Cabbage and this Red and Green Cabbage Salad recipe.
When you prep red cabbage for cooking, you will have enough scraps to color eggs pretty quickly, so there is no need to waste a perfect red cabbage to color eggs.
I always remove two to three large outer leaves before using the rest of the cabbage.
The outer leaves might be dirty and are usually dry in places, so they shouldn’t be consumed. You can wash them if needed and keep them in a plastic bag in a freezer.
You only need about six large outer leaves to make the egg dye.
Also, if you don’t use the cabbage core or any dry or welted bits, keep them for making the dye.
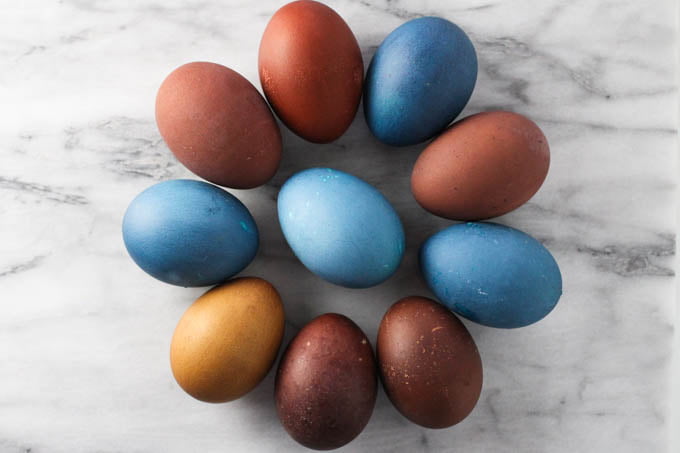
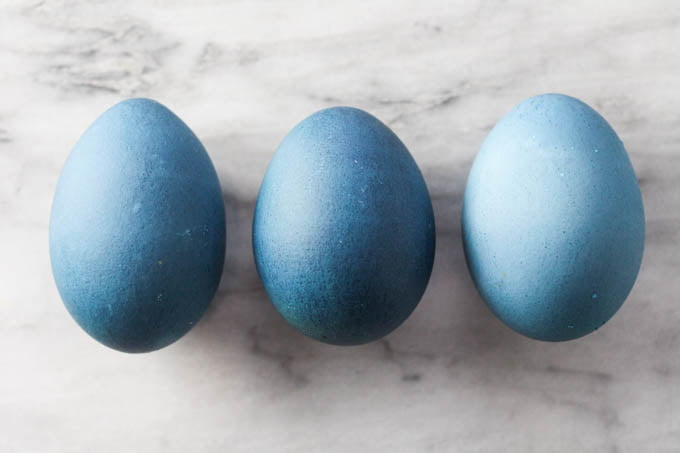
The red cabbage egg dye produces the most surprising colored eggs!
When the cabbage is called red but is, in reality, purple, you really don’t expect to see the vibrant blue when you take the eggs out of the dye.
Ingredients for the Red Cabbage Egg Dye:
- 5 to 6 large outer leaves of red cabbage or any other cut off pieces
- 6 cups water
- 2 Tbsp vinegar
How to Make the Dye:
- Roughly chop the red cabbage. Place it into a pot and add 6 cups of water. Bring the water to a boil. Reduce heat, cover, and simmer the cabbage for about 15 minutes.
- Turn off the heat and let it cool completely. Remove the cabbage pieces from the water. Add two tablespoons of vinegar and mix.
How to Color the Eggs:
Unlike the Red Onion and Black Rice Water Dyes, the Red Cabbage Dye can only be used for soaking hardboiled eggs:
- To soak the eggs in the dye, add the dye to a glass bowl. Add hardboiled eggs. Make sure the eggs are completely submerged in the liquid. You can add some water if needed. Place the bowl into the refrigerator and soak the eggs for two or four hours or overnight. The longer the eggs are kept in the dye, the brighter and more intensive the color will become.
- Remove the eggs from the dye and place them on a cooling rack to let them dry.
Tips for Coloring Easter Eggs:
Here are a few tips to help you color eggs with natural Easter egg dye:
1. Keep it safe.
Coloring eggs with natural ingredients is a fun activity for the whole family. But when it comes to handling eggs, safety always comes first. Check out this article from the University of Minnesota on Safety of Hard-Cooked Eggs for Dyeing.
2. Wipe the dye immediately if you spill it.
The color pigments in egg dyes are very strong. This is why they can color the eggs!
But they can also stain anything and everything they come in contact with: your counter-top, plastic dishes and bowls, wooden boards, tea towels and clothing, marble surfaces, and even your hands.
So, if you want to keep your kitchen nice and clean, wipe the dye right away. To protect your hands and nails from stains, wear gloves.
3. Use vinegar.
Adding acid to the egg dye helps the color pigment stick better to the eggshells resulting in bright and vibrant colors.
4. Don’t vigorously rub the eggs.
If you need to remove a spot or some moisture from the egg, gently pat it dry with a paper towel. Repeatedly wiping it might remove the dye from the eggshells.
5. Experiment with mixing the dyes.
I blended the Red Cabbage Dye and Red Onion Dye, and after soaking an egg overnight, it turned out dark green. It would be so much fun to mix different proportions of the Easter egg dyes to see the different colors they would produce.
Now It’s Your Turn!
So, what do you think about coloring Easter eggs with foods?
Have you ever tried it? What’s your favorite method? Please let us know in the comments below.
And if you’ve enjoyed reading this article, please give it a 5-star rating!

How to Dye Easter Eggs with Food Scraps
Video
Ingredients
- 5 raw or hardboiled eggs (depending on the dye you choose)
For the Red Onion Dye:
- 6 cups water
- 3 generous handfuls of red onion skins (only the dry parts)
- 2 Tbsp vinegar
For the Black Rice Dye:
- 1 cup black rice (rinsed)
- 6 cups water
- 2 Tbsp vinegar
For the Red Cabbage Dye:
- 5 to 6 large outer leaves of red cabbage (or any other cut off pieces such as cabbage core)
- 6 cups water
- 2 Tbsp vinegar
Instructions
How to Dye Eggs with Red Onion Dye
- To make the Red Onion Dye, place the onion skins into a saucepan and add water. Bring the water to a boil. Reduce the heat, cover, and let it simmer for about 15 minutes. Turn off the heat and let the liquid cool completely. With a slotted spoon, remove and discard the onion skins. Filter the liquid if needed. Add 2 tablespoons of white vinegar and mix.6 cups water, 3 generous handfuls of red onion skins, 2 Tbsp vinegar
- To cook the eggs in the dye, add the dye and the eggs to a stainless steel saucepan. Make sure the eggs are completely submerged in the liquid. Add more water if needed. Bring the water to a boil and cook the eggs for 12 minutes. Using the tong or slotted spoon, carefully remove the eggs from the water and place them onto a cooling rack to cool.
- To soak the eggs in the dye, add the dye to a glass bowl. Add the hardboiled eggs. Make sure the eggs are completely submerged in the liquid. Add more water if needed. Place the bowl into the refrigerator and soak the eggs for 4 hours or overnight. Remove the eggs from the dye and place them on a cooling rack to dry.
How to Dye Eggs with Black Rice Water Dye
- To make the Black Rice Water Dye, rinse the black rice and place it into a saucepan. Add water and bring it to a boil. Reduce the heat and cook until the rice is soft but chewy, for about 30 to 35 minutes. Place a mesh strainer over a pot or heat-resistant bowl. Strain the black rice and use it as you would normally use cooked black rice. Let the rice water cool down to room temperature. Add 2 tablespoons of vinegar and mix.1 cup black rice, 6 cups water, 2 Tbsp vinegar
- To cook the eggs in the dye, add the dye and the eggs to a stainless steel saucepan. Make sure the eggs are completely submerged in the liquid. Add more water if needed. Bring the water to a boil and cook the eggs for 12 minutes. Using a tong or a slotted spoon, carefully remove the eggs from the water and place them onto a cooling rack to cool.
- To soak the eggs in the dye, add the dye to a glass bowl. Add the hard-boiled eggs. Make sure the eggs are completely submerged in the liquid. Add more water if needed. Place the bowl into the refrigerator and soak the eggs for 4 hours or overnight. Remove the eggs from the dye and place them on a cooling rack to dry.
How to Dye Eggs with Red Cabbage Dye
- To make the Red Cabbage Dye, roughly chop the red cabbage leaves. Place them into a pot and add water. Bring the water to a boil. Reduce the heat, cover, and simmer the cabbage for about 15 minutes. Turn off the heat and let it cool completely. Remove the cabbage pieces from the water. Add 2 tablespoons of vinegar and mix.5 to 6 large outer leaves of red cabbage, 6 cups water, 2 Tbsp vinegar
- To color the eggs, add the dye to a glass bowl. Add the hard-boiled eggs. Make sure the eggs are completely submerged in the liquid. Place the bowl in the refrigerator and soak the eggs for 2 or 4 hours, or overnight. The longer the eggs are kept in the dye, the brighter the color will become. Remove the eggs from the dye and place them on a cooling rack to dry.
Recipe Notes
- Wipe the dye immediately if you spill it. The color pigments in egg dyes are very strong and might stain anything and everything they come in contact with. Protect your hands by wearing gloves.
- I suggest putting dyed eggs on a cooling rack to let them dry but make sure to put something under the cooling rack to protect your surfaces from the dripping dye.
- Discard the dye when finished coloring eggs.
The nutrition facts are an estimate. Variations in ingredient brands, portion sizes, or substitutions can affect the final nutritional values. For the most accurate information, please use a nutrition calculator or consult with a healthcare provider. Always ensure that each of the ingredients is allowed in your diet.

Meet Maria
Maria Ushakova is a holistic nutritionist and food blogger. She focuses on developing easy recipes using real food ingredients. She believes that healthy food is delicious and anyone can learn how to cook it. Maria’s work has appeared on numerous popular websites as well as in print.