
This luxuriously smooth and silky Raspberry Ice Cream doesn’t call for eggs, heavy cream, refined sugar, or even an ice cream machine!
Instead, you will use coconut milk, natural sweeteners, and my simple no-churn ice cream method to make this healthy sweet treat.

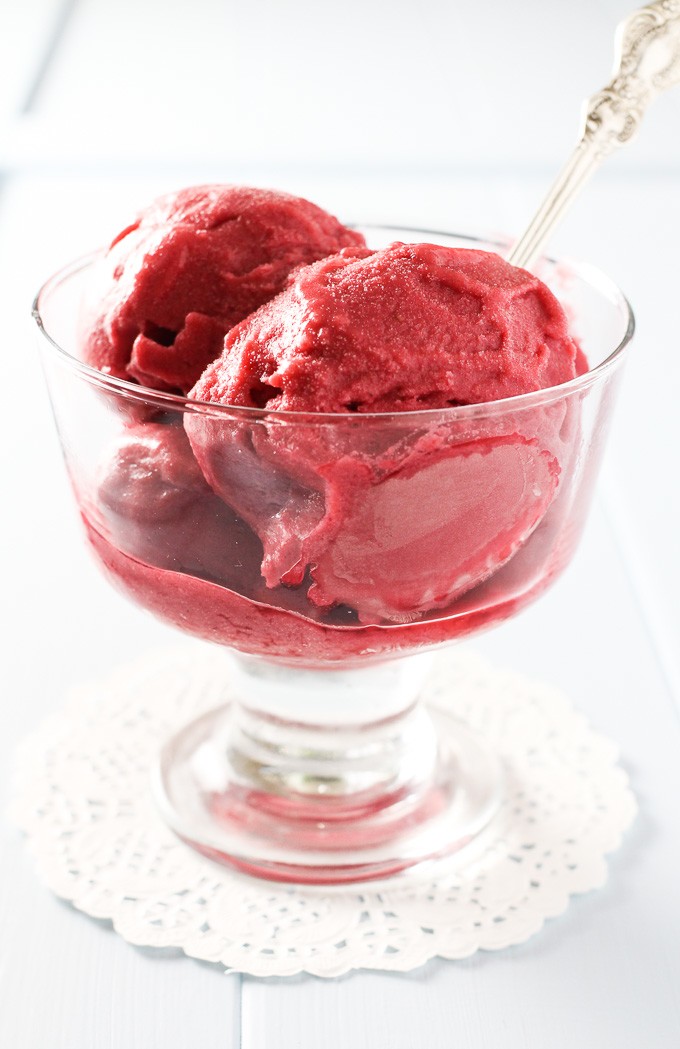
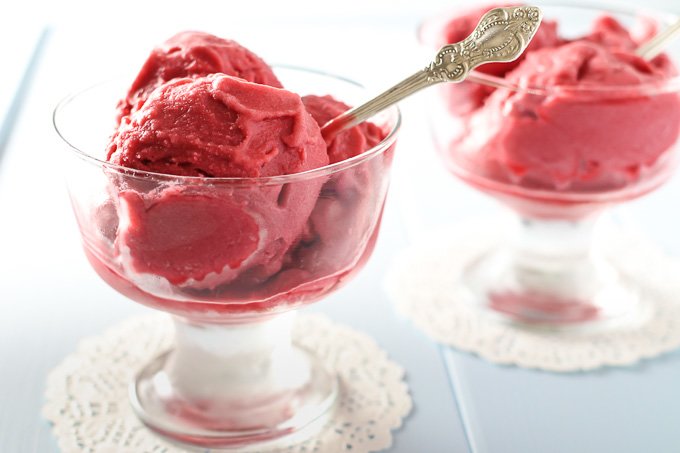
This no-churn raspberry ice cream has a rich natural flavor and is easy to make for all skill levels.
It will satisfy your sweet tooth during hot summer days.
It’s so delicious that it’s hard to believe it only calls for five simple ingredients and is vegan to boot!
Why You’ll Love This Recipe
Here are four reasons why this homemade ice cream recipe is a keeper:
- This fresh raspberry ice cream is just as satisfying as its high-fat, sugar-packed store-bought counterpart. But it’s made without milk, eggs, and refined sugar.
- There’s no fancy ice cream maker or tedious churning needed. Instead, you only need a food processor and a muffin pan to make a soft, custardy batch of ice cream from scratch.
- The raspberry ice cream base freezes beautifully in perfect single scoop-size portions, ready to blend whenever you have a sweet tooth.
- You aren’t limited to raspberry-flavored ice cream. With this no-churn technique, you can make all of your favorite flavors.
Ingredients and Equipment
Here is what you’ll need to make this raspberry ice cream:
- Raspberries – When buying fresh raspberries, look for bright, firm, plump berries with a sweet fragrance and free of mold or bruising. If you aren’t satisfied with the selection, grab a bag of frozen raspberries.
- Coconut milk – Be sure to use a can of full-fat unsweetened coconut milk and double-check the ingredients before purchasing it. You only want to see coconut, water, and guar gum on the label.
- Arrowroot powder – This gluten and grain-free flour is extracted from the starchy matter of the tropical Arundinacea plant. Do not replace arrowroot powder with cornstarch. Corn starch is a more processed ingredient, and your ice cream won’t be as silky smooth.
- Maple syrup – To sweeten the ice cream and add flavor. You can also use date syrup or agave nectar.
- Vanilla extract – Use pure vanilla extract with at least 35% alcohol. The alcohol helps keep the ice cream stable, soft, and creamy in the freezer and prevents the formation of ice crystals.
- Equipment – You’ll need a powerful food processor or high-speed blender and a muffin pan. I use a silicone muffin pan, and the ice cream cups just pop right out.
How to Make Raspberry Ice Cream
Here are the step-by-step instructions on how to make ice cream without an ice cream maker:
How to Make Raspberry Ice Cream Base
- Make the thickening slurry: Dump the whole can of coconut milk into a medium pot. Scoop about a ¼ cup of the thin milky liquid from the pot, add it to a small bowl with the arrowroot powder, and whisk until smooth.
- Make the ice cream base: Heat the remaining coconut milk in the pot over medium heat until the solids melt and the coconut milk is fully liquified. Then, slowly pour in the arrowroot slurry while whisking constantly. Before the mixture reaches a simmer, remove the pot from the heat and set it aside.
- Puree the raspberries: Meanwhile, add the raspberries to a food processor and process them until pureed. Next, use a spatula to push the puree through a mesh sieve to strain the seeds.
- Flavor the ice cream base: Once the ice cream base is cooled to room temperature, whisk in the maple syrup and vanilla. Then, add it to the food processor with the raspberry puree and pulse until combined.
How To Freeze and Store No Churn Ice Cream
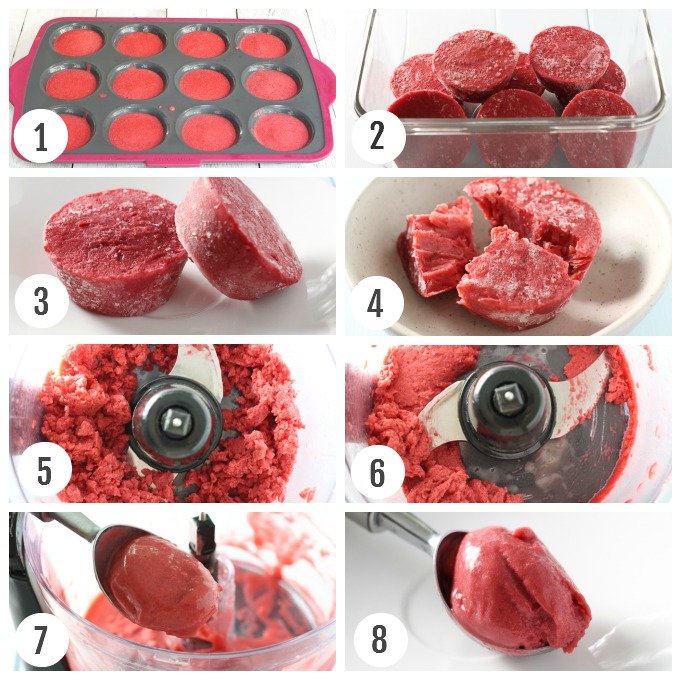
- Divide the ice cream mixture evenly in a 12-cup muffin pan. Place the pan in the freezer until the cups are frozen completely solid (about 3 hours or up to overnight). (Photo 1)
- Then, pop the cups out of the pan and keep them frozen in a freezer-safe resealable bag or container. (Photo 2)
- Once ready to serve, take the raspberry ice cream cups out of the freezer. I find that one cup is equal to one large scoop of ice cream. (Photo 3)
- Depending on your food processor, you might want to break the cups before you process them. My food processor is not very powerful and wouldn’t process a whole ice cream cup, so I just break them up with a sharp knife. (Photo 4)
- Place the raspberry ice cream chunks into a food processor and start processing them. First, you will notice that the mixture falls apart into crumbs, and you will seriously doubt that this could ever become ice cream. (Photo 5)
- Just keep processing it, and suddenly, you will see that the crumbs stick together and magically turn into a soft serve with a creamy texture. (Photo 6)
- At this point, just scoop the fresh mango ice cream. (Photo 7)
- And serve! (Photo 8)
Recipe Tips
Take note of these tips and tricks for guaranteed no-churn raspberry ice cream success:
- When you open most cans of full-fat coconut milk, you’ll find a thick layer of coconut cream on the top and liquid milky coconut water on the bottom. Mix the arrowroot powder with the liquid portion for the slurry, NOT the cream.
- The arrowroot slurry will lose its thickening properties if cooked, so be sure to remove it from the heat before it reaches a simmer. Let it cool completely before adding sweeteners and flavor.
- You can puree frozen raspberries, but it’s best to let the puree thaw before straining the seeds. Otherwise, it will be nearly impossible to push it through the strainer.
- I use a silicone muffin pan, and the ice cream cups pop right out. If you’re having trouble removing the cups from a regular muffin pan, fill the sink with an inch of warm water and set the bottom of the pan in the water for a few seconds to loosen up the cups.
- You can also freeze a part of this vegan raspberry ice cream in popsicle molds and then dip them in melted chocolate before serving.
Variations
The beauty of this raspberry ice cream recipe is that you can mix pretty much any pureed fruit into the coconut milk ice cream base.
So, feel free to mix and match the raspberries with other types of fruit and berries, such as:
- Apricots
- Banana
- Blackberries
- Black Raspberries
- Blueberries
- Cantaloupe
- Honeydew
- Kiwi
- Mango
- Papaya
- Peaches
- Pineapple
- Raspberries
- Strawberries
Healthy Ice Cream Sundae Topping Ideas
This dairy-free raspberry ice cream is delightful as is, but adding your favorite ice cream sundae toppings is never a bad idea:
- Saucy toppings: Drizzle caramel, chocolate sauce, mango puree, strawberry sauce, raspberry sauce, or blueberry sauce over the top.
- Creamy toppings: Top scoops of this raspberry ice cream with a dollop of vegan whipped cream, banana slices, almond butter, or peanut butter.
- Crunchy toppings: Sprinkle it with toasted coconut, almonds, walnuts, pistachios, hazelnuts, cacao nibs, chia seeds, chopped pretzels, mini white or dark chocolate chips, chocolate bark, sugar-free granola, or extra fresh or frozen raspberries.
Storing
This recipe yields roughly 2.5 pints (6 two-scoop servings), but you do not need to blend and serve it all at once. Instead, you can blend as many cups as you want and store the rest in an airtight bag or container in the freezer for 2-3 months.
Frequently Asked Questions
Here are a few related questions on how to make this raspberry ice cream recipe:
How many servings does one muffin cup of the ice cream base make?
One frozen muffin-size cup equals about one large scoop of ice cream. When entertaining, I typically account for each guest wanting two scoops.
What can I use to make this if I don’t have a muffin pan?
You don’t necessarily have to use a muffin tin, but the pre-portioned servings are super convenient. You can also use a large ice cube tray or a similar mold.
What can you substitute for coconut milk in dairy-free ice cream?
Full-fat canned coconut milk thickens perfectly into soft ice cream. You can make it with almond milk, but your ice cream won’t be as thick and creamy.
If dairy isn’t a concern, you should be able to use full-fat plain or vanilla yogurt instead of coconut milk.
Keep in mind I’ve never tested this recipe with a coconut milk alternative, so please let us know what worked for you in the comments!
More Frozen Dessert Recipes
If you like making ice cream at home, check out these healthy recipes:

Vegan Raspberry Ice Cream (No Churn Recipe)
Equipment
- Food Processor (or blender)
Ingredients
- 1 can (14 oz/398 ml) full-fat unsweetened coconut milk
- 1½ Tbsp arrowroot powder
- 3½ cups fresh or frozen raspberries (about 1 pound)
- ¼ cup maple syrup
- 1 Tbsp vanilla extract
Instructions
- Pour all contents from the coconut milk can into a medium pot. Scoop 3 to 4 tablespoons of the coconut milk liquid into a small bowl (sometimes there will be solid and liquid coconut milk in a can, depending on the quality of the coconut milk and the room or storage temperature). Add the arrowroot powder into the bowl and whisk until fully smooth.1 can (14 oz/398 ml) full-fat unsweetened coconut milk, 1½ Tbsp arrowroot powder
- Place the pot with the coconut milk on the stove and begin heating it over medium heat. Once the solid parts of the coconut milk dissolve and the coconut milk becomes fully liquid, slowly pour the arrowroot mixture into the coconut milk while constantly whisking.
- You will notice that as you warm it up, the coconut milk will become thicker. It is very important not to overheat it - do not bring it to a boil or simmer because if overheated, the arrowroot powder will lose its thickening ability. Once the coconut milk is hot and has thickened, take it off the heat and let it cool a bit.
- In the meantime, make the raspberry puree. Place the raspberries into a food processor and puree until smooth. To remove seeds from the raspberry puree, push the puree through a fine-mesh strainer using a spatula. If you are using frozen raspberries, make sure to thaw the puree first, otherwise you won't be able to push it through the mesh. (You will be surprised by the amount of seeds you'll get!)3½ cups fresh or frozen raspberries
- Once the coconut milk is room temperature, add the maple syrup and vanilla extract and whisk to combine.¼ cup maple syrup, 1 Tbsp vanilla extract
- Add the coconut milk mixture to the raspberry puree and combine. You can also pour the mixture into the food processor and pulse a few times until well combined.
- Divide the ice cream mixture equally among the 12 muffin cups. Place the muffin pan into the freezer and let the ice cream freeze for about 3 hours (depends on the temperature in your freezer). Once the ice cream is frozen, pop the ice cream cups out of the muffin pan and store them in a glass container with a tight lid or in a plastic bag.
- When ready to serve, place the ice cream cups into a food processor (break them up with a knife if needed before placing them into a food processor) and process until soft ice cream consistency. Scoop into bowls and serve.
The nutrition facts are an estimate. Variations in ingredient brands, portion sizes, or substitutions can affect the final nutritional values. For the most accurate information, please use a nutrition calculator or consult with a healthcare provider. Always ensure that each of the ingredients is allowed in your diet.

Meet Maria
Maria Ushakova is a holistic nutritionist and food blogger. She focuses on developing easy recipes using real food ingredients. She believes that healthy food is delicious and anyone can learn how to cook it. Maria’s work has appeared on numerous popular websites as well as in print.
Hi Maria! I was interested in the glycemic index of this recipe . Could you tell me what it is or how to calculate it ? Thanks
Sarah
Hi Sarah! This article explains how to calculate glycemic index of a mixed meal: http://www.livestrong.com/article/74125-calculate-glycemic-index/